Here is the circuit for a simple emergency light for students in led projects category. Electronic components for this project are readily available. Three 1 W LEDs used in this circuit will give sufficient brightness for an emergency light. Use a 5V mobile charger to charge the 4V battery used in this circuit. One LED is used in the charging circuit to indicate the charging process. This simple led projects circuit is recommended for students to learn electronics through experiments.

First place all the electronic components such as resistor, diode, LED, Battery etc. on a breadboard according to the circuit diagram and check the circuit. If any problem in the working of circuit detected, try to solve it. In this way students get familiarize about the electronics circuits. By doing such simple electronics projects students can easily learn about resistors, diodes, LEDs etc. Study the working of each component and do the project. This will help students to get a complete picture of each component.

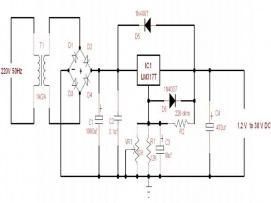
Circuit Diagram of Simple LED Emergency Light
Applications of these kinds of projects are according to the user. You can use this as a light source in many places. Also use this as a light source while riding your bicycle at night times. Try to include this circuit in any other projects. Do this project and try to modify the circuit.
Simple LED emergency light project is an easy led project. But it is very useful nowadays due to load-shedding problems. 3W led brightness is good enough for a room during night time. So students make this and surprise your parents at the time of load-shedding.


Copyright © 2024 Mepits - Designed By Digiora


